Mattress Stitch Crochet Seam: A Strong and Secure Finish
Mattress Stitch Crochet Seam: Mastering the Art of Invisible Seams
Mattress Stitch Crochet Seam: Mastering the Art of Invisible Seams
How to Join Crochet Squares: Video Tutorial
TIP: To view this mattress stitch join video tutorial properly, please disable any ad-blocker you have running.
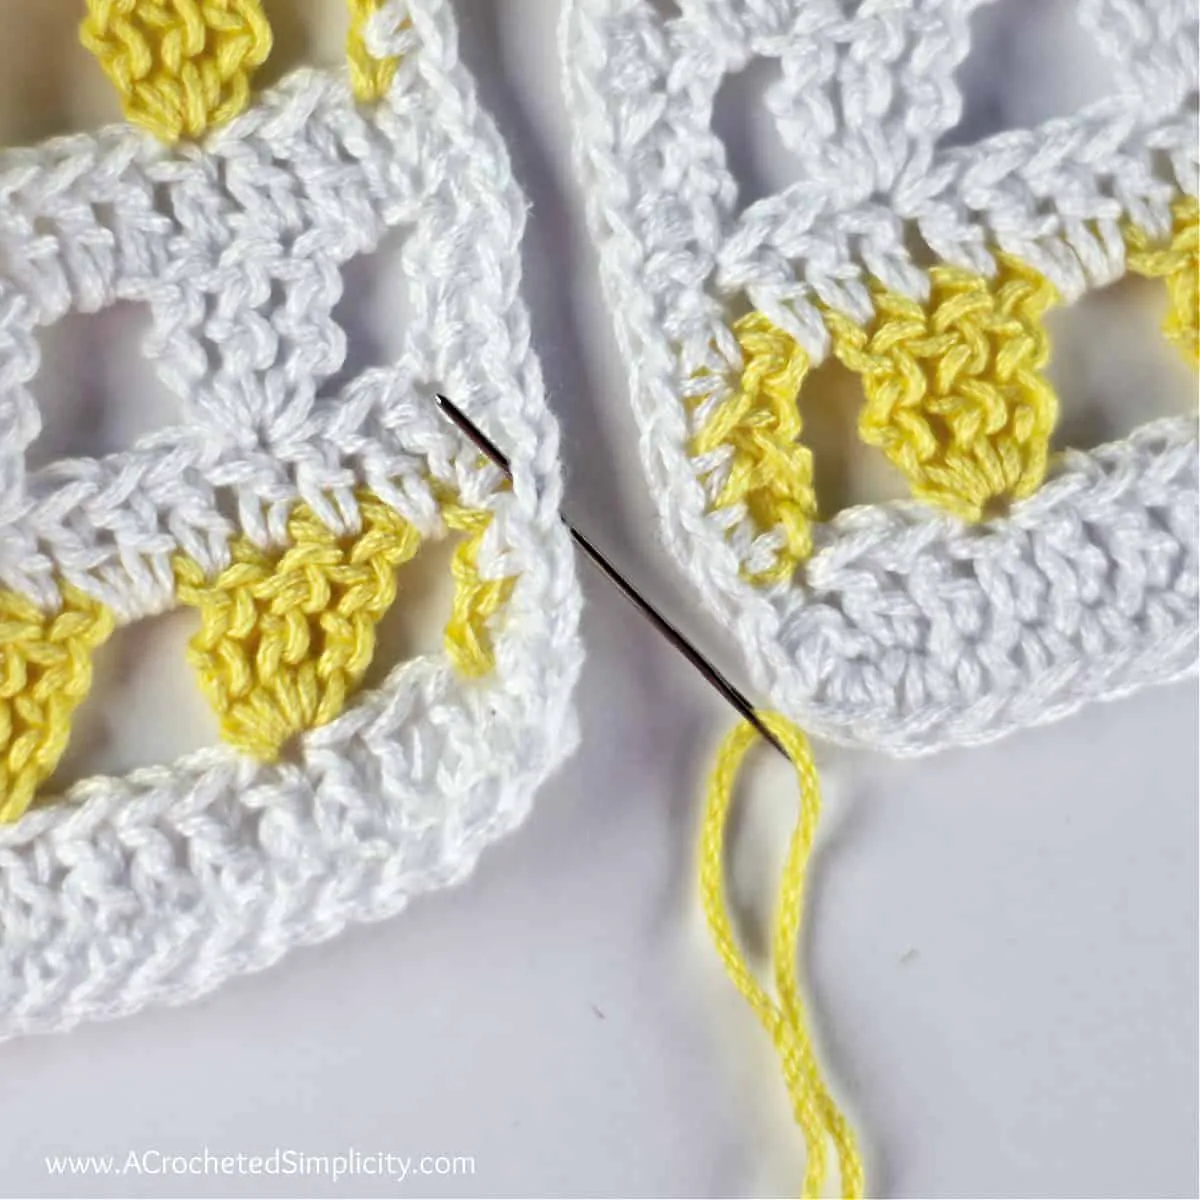
Step 1: Prepare Your Crochet Motifs
Place two pieces of your crocheted motifs on a flat surface with the RIGHT SIDE facing you. This ensures that the seam will be neat and invisible when viewed from the front.
Thread your yarn needle with the same yarn you used to crochet your motifs. For this tutorial, I used contrasting red yarn to clearly show the mechanics of the mattress stitch. Using matching yarn will create a seamless finish.
Step 2: Start at the Corner
Take the first square and insert the needle from the top of the first corner stitches, then bring it out through the bottom of the second corner stitch. Pull the yarn through gently.
Repeat this step with the second square, starting at the far-right corner space. Pull the yarn gently but not too tight.
At this stage, ensure all stitches are clearly visible to make the process smoother.
Step 3: Work Between Stitches
Return to the first square. Insert the needle into the same chain where it came out previously, then bring it out through the next stitch, working behind the back loop.
The most important thing here is to keep the tension consistent for a neat seam.
Repeat this process on the second square.
Insert the needle from the top, between the front and back loops of the chain where the yarn came out, and make the needle exit from the center of the next stitch.
How to Mattress Stitch Crochet?
If you’ve found yourself here, you’ve likely asked “How do you crochet a mattress stitch?”
Learn how to seam crochet pieces together using mattress stitch crochet in the step-by-step crochet photo tutorial below.
I am using a different color yarn to make it easier for you to see how to make a mattress stitch seam.
The photos below are of a seam being worked in the Sunny Days Cover Up.
Step 1:
Cut a length of yarn that is 2 – 3 times the length of the seam you will be creating. Thread your yarn needle or tapestry needle.
Lay your two crochet pieces on a flat surface with the right side facing up. Make sure to align the stitches along the edges being seamed.
Insert your yarn needle from bottom to top, through a stitch on the left.
Step 2:
Insert your yarn needle from bottom to top, through a stitch on the right.
Step 3:
Insert your yarn needle from bottom to top, through a stitch on the left.
Step 4:
Continue working back and forth creating a zig zag with the yarn between the panels.
What Common Mistakes Should You Avoid with Mattress Stitch in Crochet?
To avoid common mistakes with the mattress stitch in crochet, be mindful of your technique and preparation. Here are key mistakes to avoid:
- Not matching tension.
- Misaligning stitches.
- Over-tightening or leaving stitches too loose.
- Using the wrong yarn or crochet hook.
- Ignoring the gauge.
- Not considering the fabric type.
- Not Matching Tension:
Not matching tension can result in uneven seams. The tension of your stitches influences the overall appearance of your project. A consistent tension creates a smooth and flat seam, while varying tension can lead to puckering or gaps. - Misaligning Stitches:
Misaligning stitches occurs when you do not properly line up the edges of the pieces being sewn together. Proper alignment is essential. Misalignments can lead to crooked seams and can compromise the structural integrity of your crochet item. - Over-tightening or Leaving Stitches Too Loose:
Over-tightening stitches results in a seam that is stiff and hard to adjust. Conversely, leaving stitches too loose can create a seam that appears sloppy or may unravel. The goal is to achieve a comfortable tension that allows the seam to remain flexible while still being secure. - Using the Wrong Yarn or Crochet Hook:
Using the wrong yarn or crochet hook impacts the ease and effectiveness of the mattress stitch. Factoring in the thickness and type of yarn, as well as matching the hook size to the yarn weight, is important for achieving a neat finish. - Ignoring the Gauge:
Ignoring the gauge can affect the fit and overall appearance of your project. Gauge refers to the number of stitches and rows per inch. If the gauge is not consistent with the pattern, it can alter the dimensions of your finished piece. - Not Considering the Fabric Type:
Not considering the fabric type may lead to improper seam cohesion. Different fabrics can respond differently to the mattress stitch. For instance, slippery yarns require more careful handling to prevent loosening.
By avoiding these common mistakes, you can improve the quality of your crochet projects and ensure a more polished finish.
Reasons I Love the Mattress Stitch Crochet Seam:
- The mattress stitch crochet seam is the MOST invisible crochet seam!
- It’s versatile and can be used for all types of crochet projects.
- This crochet seam is flat (as opposed to a slip stitch seam which creates a ridge, and even the flattest slip stitch seam has a tiny ridge).
- You can easily seam two pieces of crocheted fabric that may not be the same exact length simply by evenly distributing the slack over the length of the seam. The result is a seam without a pucker (as long as there isn’t a huge difference in length between the two pieces).
- This is the main reason I used this technique for the Urban Crossover Pullover.
- I have a crochet blanket design being released in August that I’ve been using this seaming technique on.
The mattress stitch is the most common technique used to sew panels together. It’s a simple technique and I’ll give you a couple of tips to help make it easier.
TIP #1: As you’re sewing your seams, make sure to stop every couple inches and pull both ends of your yarn to tighten the seam. If you wait until you’re done sewing and then try to pull the ends through the entire length of the seam, you may end up with gaps or puckers.
TIP #2: Use several stitch markers when suggested. The stitch markers not only hold pieces together temporarily, they also help guide you to seam things, such as sleeves, evenly.
Tip #3: The most important thing to remember about this technique is to insert your yarn needle the same direction on both panels that you’re seaming. If you insert from bottom to top on the left side, make sure to insert bottom to top on the right side and vice versa (I prefer to insert my yarn needle from bottom to top). See photos and instructions below.
Tip #4: Insert your yarn needle through the middle of the stitch, not around it. By working in the middle of stitches, you can conceal the seam much more than working around stitches. Working around stitches may create small gaps

Tegs:
Search
Recent Posts
-
Find the Perfect Crib Mattress: Halo Dream Weave for Safe and Comfortable Sleep
Jun 10 2025
-
Learn to Fill Stitch Like a Pro with This Easy-to-Follow Tutorial
Apr 14 2025
-
How to Tie Off a Stitch in Embroidery: A Beginner's Guide
Apr 14 2025
-
Learn the basics of cluster stitch knitting, a technique that adds a beautiful and unique texture to your knitted projects.
Apr 14 2025
Subscribe to Updates
Get the latest posts and fashion insights directly in your inbox.