Overlocker Thread Spools: A Guide to Choosing the Right Spools
Find the Perfect Overlocker Thread Spools: A Guide to Choosing the Right Type
Find the Perfect Overlocker Thread Spools: A Guide to Choosing the Right Type
How to Thread an Overlocker / Serger
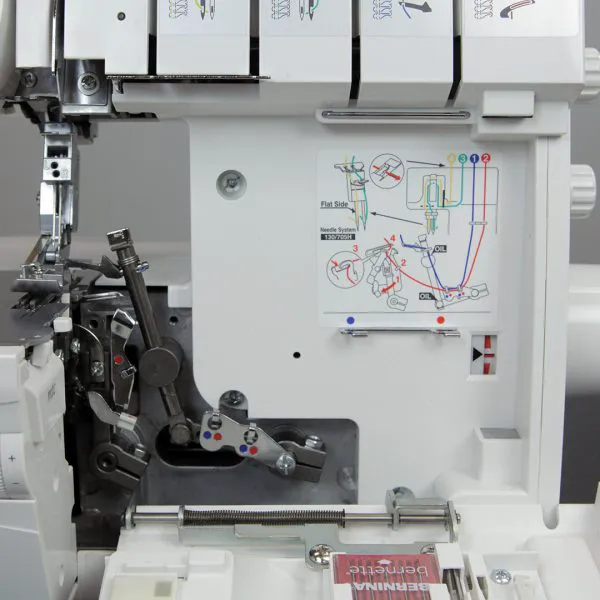
There are several helpful threading tools stored in the looper cover door. You can find your tweezers, screw driver and needle/threader holder tool here along with some spare needles and a lint brush.
Raising the presser foot releases the tensions disks on all the threads. This will make it easy to thread and also enables you to be able to tie threads together and pull them through the machine with ease.
Pamela Boynton
December 26, 2024 - 6:18 amI have that exact 800D. While I like the machine, and have had it for a Very Long Time, the Tie-A-Knot method often causes me more problems than if I just took everything off. Rethreading the needles is easier than catching the knot, cutting it off, and then having to rethread the needles before it stops with the knot unable to go through the eye. However, The cone you should rethread 2nd, that last cone in the line!, the one you have to take all through the bottom, and is a major pain if you have to get it through that slide, and then try to grab hold of it to get it to the eye of that arm – it really is difficult to grab hold of. That is the ONE that IF I can get the tie a know method to work, is really easier.
So I usually just leave white thread on the 800D, and change colors on My Mom’s old Simplicity. It sews just as well, and is so much easier to rethread. Reply to comment
Tip: Storing Overlocker Thread
Earlier in the year for my birthday I received an overlocker. (A serger for my US readers.) This was one of those things that I’ve been wanting and considering for a while but wasn’t really sure that I needed. I’m still not sure that I will use it a lot but I think that is because I’m not that sure what I can do with it! I’m going to some classes in the coming months to learn the basics so stay tuned for some updates!
To do my first class, I had to buy threads and I realised that storing overlocker threads was going to need some thought. These threads come on much larger spools than ordinary sewing machine threads so I was going to need to find somewhere to store these. Also my machine can take up to 8 spools of thread at a time so I fear I’m going to end up with lots of thread to store!
Thankfully one of my new Ikea tins was the perfect height. It came in a set of three and I wrote about a couple of them that I decorated with washi tape recently. The largest one is perfect for my threads! For now there is also room in the tin for some of the extra tools and things for the overlocker.
Storage problem solved. Now to learn to use the machine and get braver…
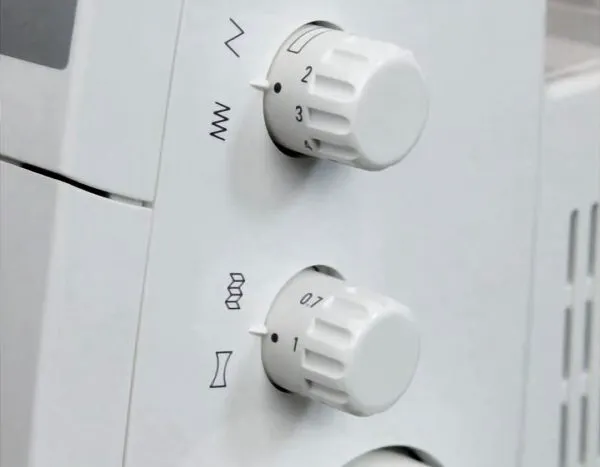
Step 14: Set the stitch length and differential feed
The final settings to change are easily accessible at the right of the machine. Stitch length is the top knob and the default is 2.5, just like a sewing machine.
The differential feed knob is directly below this knob and is adjusted based on fabric performance. Overlockers have two sets of feed dogs, which move independently. When you adjust differential feed you are adjusting the way these feed dogs move. At a setting of “1” they move at the same rate. The setting “2” creates a gathering effect, as the front feed dog moves more fabric than the back. Conversely, the setting “0.7” creates a stretching effect moving less fabric than the back feed dog. This is a wonderful feature for creating perfectly flat seams when working with knits.

Tegs:
Search
Recent Posts
-
Master Janome Overlocker Threading: A Beginner's Guide
Apr 15 2025
-
Janome AirThread 2000D Review: A Powerful & Versatile Overlocker for Your Sewing Needs
Apr 17 2025
-
Babylock Jet Air Overlocker: Your Guide to Professional Finishing
Apr 19 2025
-
Overlocker Air Threaders: The Ultimate Guide to Easy Threading
Apr 20 2025
Subscribe to Updates
Get the latest posts and fashion insights directly in your inbox.