How to Take in the Waist of Jeans: Hand Sewing Tutorial
Alter Your Jeans: Learn to Take in the Waist by Hand
Alter Your Jeans: Learn to Take in the Waist by Hand
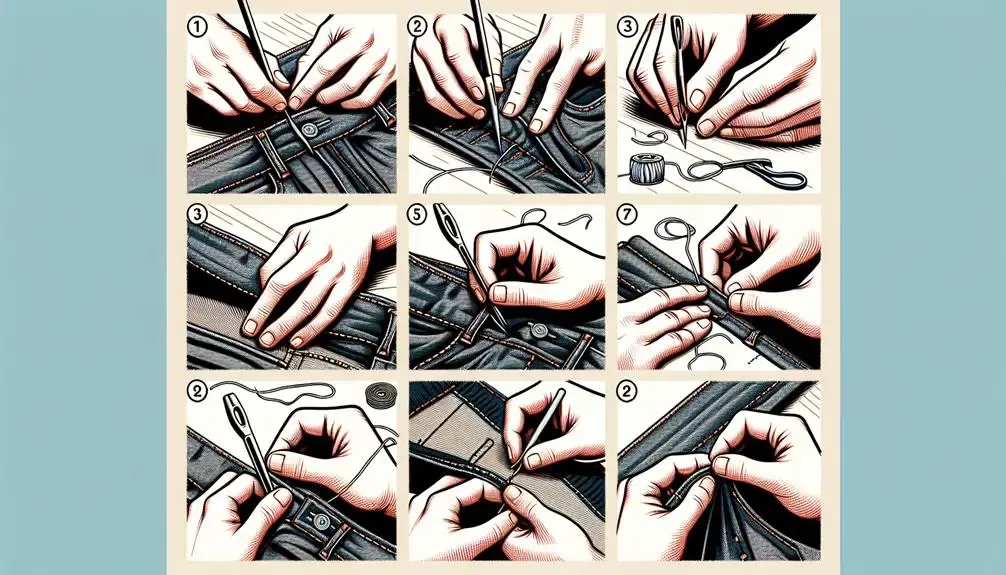
Mark where to alter
To start, use tailor's wax as your marker.
Squeeze the back of the jeans together, adjusting it to how tight you want it to be, and then make a mark on both sides so that you know where you will be altering it.
Drawing a V shape on the waistbandFrequently Asked Questions
How Do You Make Jeans Waist Smaller by Hand?
To make jeans waist smaller by hand, I mark the area, stitch a criss-cross pattern, and guarantee symmetrical stitching for balance. Testing for comfort is essential before finishing the adjustment. Experimenting with different thread thicknesses can help customize the alteration.
How Do You Fix Jeans if the Waist Is Too Big?
To fix jeans with a too big waist, I'll mark and stitch a V-shape on both sides starting beside the belt loop. I criss-cross the thread securely across the back and tie knots near the belt loop for a perfect fit.
How Can I Reduce the Waist Size of My Jeans?
Reducing the waist size of jeans involves stitching a V-shape alteration with thick thread. Begin at the belt loop, criss-cross stitch down for security, tie knots near the loop, test for comfort, adjust as needed for fit.
How Do You Take in Pants by Hand?
To take in pants by hand, mark and stitch a V-shape alteration on the waist, ensuring symmetrical sides for comfort. Test the fit and adjust as needed. Secure knots inside for durability. It's important to check for a snug fit.
Entrepreneur / Blogger at Knowing FabricRohan is an entrepreneur and blogger that is an expert on fabrics. He has started and grown numerous businesses in the fabric industry. He is passionate about sharing his knowledge of fabrics with others and helping them find the perfect fabric for their needs. Rohan's blog provides valuable information on a variety of topics related to fabrics, including how to select the right fabric for a project, care for fabrics, and where to find the best deals on fabric.
Latest posts by Rohan (see all)- How Does Ring Spun Cotton Affect Garment Fit and Shape Retention? - August 13, 2024
- What Are the Challenges in Producing Ring Spun Cotton? - August 13, 2024
- Is Ring Spun Cotton Suitable for Plus-Size Clothing? - August 13, 2024
How to take in the waist of jeans the quick way?
Third Sewing Method
adding dart at side seams of the pants with ladder stitch
Skill level: beginner
Useful Tools and Sewing Supply that I use:
- chalk or marker
- sewing thread – possibly embroidery one because it is stronger
- sewing needle
- scissors
This sewing method is beginner friendly and it can be done in a mater of minutes.
Take the measurements of your waist and see how much you need to take in the waist.
Divide the “take in” amount into two and after that mark it on each of the side seams of the waistband.
You start by chalk marking a triangle at the side of the waist, starting at the metal studs and go up to the top of the waistband.
That tip of the triangle is the bottom of the dart by the stud.
Now, you need to insert the threaded needle with the knot at the end from wrong side of the jeans to the right side.
Finally you can start stitching from the bottom up, so that means from the metal stud up. Or from top of the waistband down.
Whatever works best for you.
As you stitch you will make the invisible ladder stitch.
Once you reach the finishing point pull the thread all the way as you join the two seams together. And finally make a knot at the end of the stitch to secure it.
By now, your pants should be done and ready to be worn!
Here is a very useful sewing tutorial to follow along.
When you have a busy schedule then the last thing you might want to do is something like this very complicated tightening jeans waist alteration. But don’t be discourage, it is not that complicated as it seams. This is that extra special sewing skill that will get your jeans the perfect fit that you want.
Learning how to take in the waist of jeans doesn’t have to be time consuming. Once again, there are few different ways to do this alteration, so research, to see what is the best way for you, that works for your needs. Do you want a permanently alter the waist or are you looking for temporary sewing solution?
This video might be helpful for any of you that struggle with starting a hand stitch and later finishing of a sewing stitch with a properly done sewing knot.
How to properly tailor men”s, women”s, and children”s trousers at home
Whether you’re looking to update your wardrobe or address a fitting issue, learning how to tailor pants at home can be a rewarding skill. Men’s, women’s, and children’s pants can all be adjusted to ensure a perfect fit without going to a tailor if you take the proper approach.
You can follow this guide to learn the basic steps of tailoring pants to fit a variety of body shapes and sizes. You’ll discover how to use a few basic tools to create professional-looking results, from straightforward hem adjustments to more involved resizing.
Whether you’re an experienced sewer or a novice, learning these techniques will enable you to make custom-fitted pants that meet your comfort and style requirements while also saving money.
| Type | Steps |
| Men"s Trousers | 1. Measure waist and inseam. 2. Mark the desired length and width on the fabric. 3. Cut and sew along the marked lines. 4. Try on for fit and adjust if necessary. |
| Women"s Trousers | 1. Take accurate waist, hip, and inseam measurements. 2. Adjust the pattern or fabric according to measurements. 3. Cut fabric and sew side seams and hems. 4. Fit and tweak as needed. |
| Children"s Trousers | 1. Measure waist, hips, and length. 2. Use a pattern or make adjustments to a standard pattern. 3. Cut and sew with extra room for growth. 4. Check fit and make any final adjustments. |
- Reducing at the waist
- Adjusting the middle seam
- Adjust only on the sides
- Reduce using darts
- Reducing the width
- Sew on the sides
- We take in trousers on the sides
- Features of flared trousers
- Features of working with arrows
- Video on the topic
- How to properly TIGHTEN trousers | 0+
- Several options for how to take in trousers.
- How to reduce trousers at the hips. Take in trousers on the sides and reduce by 3 sizes
- How to take in trousers at the waist by several sizes✂️

Tegs:
Search
Recent Posts
-
Weave Care 101: Maintaining a Beautiful & Healthy Weave
Apr 15 2025
-
How to Remove Embroidery from a Backpack: A Simple Guide
Apr 18 2025
-
How to Remove Embroidery: Learn How to Take Off Embroidery Without Damage
Apr 25 2025
-
How to Take Quick Weave Out with Conditioner: Safe and Easy Hair Removal Techniques
Apr 25 2025
Subscribe to Updates
Get the latest posts and fashion insights directly in your inbox.