Embroidery Without Knots: A Beginner's Guide to Starting & Ending Techniques
Mastering Knot-Free Embroidery: A Simple Guide
Mastering Knot-Free Embroidery: A Simple Guide
Executing the Loop Method Step-by-Step
Starting your cross stitch journey right is crucial. Begin with a simple pattern, like one that’s 8” square. Choose from patterns with 3 to 10 colors. This is perfect for first-timers.
For materials, pick 14 count white Aida. It’s clear and easy to work with. Adding 3 extra inches on each side makes your project easier to handle.
The loop method is both easy and makes your work shine. Use a size 24 tapestry needle with your 14ct Aida. Find the center easily by folding the fabric into quarters.
Thread your needle after cutting it to the right length. This is usually done with kits. Start your first stitch in the left hole and finish in the top left hole. This creates the neat “X” stitch that’s key to your design.
Starting with a basic kit won’t cost you much, maybe under $15. You might want to add special scissors or finishes later. These add a nice touch to your work.
As you learn with free patterns, know that many have succeeded with the loop method. Getting a hoop a bit bigger than your project, threading your needle – you’re ready. Enjoy the rewarding world of cross stitch. A simple loop can begin your journey to making beautiful designs.
Setting Up for the Loop Method
Starting your cross stitch journey is thrilling, especially with the loop method. This technique makes stitching easier and improves your design’s look.
Picking the right number of strands is key. For most patterns, two strands are enough. But you might use four for more detail.
Cutting and Folding Your Floss
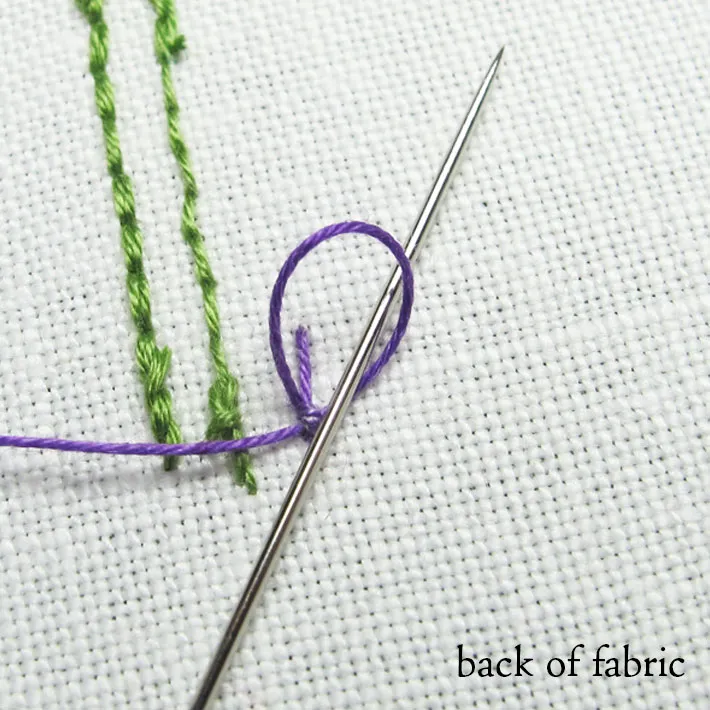
Begin by cutting your floss twice the usual length. If you use DMC thread, it has ends ready to cut, which helps. Then, fold the floss and thread your needle. This step is essential for efficient use of your supplies and neat results.
Threading the Needle for Success
After preparing your floss, thread both ends through the needle’s eye. Choose a needle that matches your fabric. Using a loop at the end of your floss helps avoid knots, keeping your work’s back smooth.
The loop start is common in many cross stitch patterns and tutorials. It’s a key step for a tidy and professional finish.
Stitch directions must be consistent for a neat look. When changing or ending a thread, use tutorials to do it without knots. This keeps the back of your work clean.
By learning the loop method and following the advice, you make every cross stitch project enjoyable and rewarding.
Understanding the Basics of Cross Stitch
Wanna start cross stitching? Knowing the basics is key. It’s a fun hobby that lets you make beautiful, lasting art. Whether you start with free cross stitch patterns or buy cross stitch kits, we’ll guide you through fabrics, threads, and more.
Picking the right cross stitch supplies is important for a good outcome. Start with the right fabric. Aida fabric is good because of its easy square patterns. It comes in different counts, like 11 or 14 holes per inch. The simple grid makes it perfect for beginners.
It’s crucial to read your pattern first. Check the symbols which represent colors and stitches, like back stitches or French knots. Free patterns online usually come with easy guides for beginners. They’re a great way to start.
- Grids: Each square represents one cross stitch.
- Legends: They show which colors to use.
- Backstitches: Solid lines are for outlining.
- French Knots: Dots are for adding detail.
Making sure your fabric stays in good shape is also important. Use tape to stop the edges from fraying. Also, learn the ‘frogging’ technique. It helps fix mistakes by undoing stitches.
When you finish your piece, you need to display it nicely. Trim the fabric to about a 3cm margin if you’re using a hoop. This makes it look neat and professional.
Get into cross stitch with these tips. Pick the right cross stitch supplies and enjoy making all kinds of cross stitch patterns, including free cross stitch patterns. Happy stitching!
Starting a Thread With a Temporary Knot
Surprisingly enough, the best way to start a thread is with a knot — but it's not a permanent fixture in the back of your embroidery. Rather, using a temporary knot makes it easy to start your stitching without risk of pulling the thread through, all the while securing it in place and keeping your work tidy.
There are two basic temporary knots used to start embroidery. These are the away knot and the waste knot. Both versions start with a knot at the end of the embroidery thread. An away knot works with virtually all embroidery stitches, while a waste knot is best worked with a stitch that has the potential to cover the tail as you stitch, securing it in place. Satin stitch and cross stitch are two good examples, as both of these stitches cross the tail of the knot on the backside of the work.
- Away Knot: An away knot is worked 3 to 5 inches away (hence its name) from the area where the embroidery begins. The knot is clipped after working the embroidery, and then you thread your needle with the tail and weave it through the stitches on the backside of the fabric in the same manner as you weave the tail when ending a thread. Note that you will be wasting a few inches of your embroidery thread, so you may want a different option if you are using expensive threads. You also need to be careful not to cross your threads with the tail of the away knot while working your embroidery.
- Waste Knot: A waste knot is placed on the front side of the fabric, drawing out its tail on the backside to work over. As you work towards the knot you are covering and locking the tail of the knot in place. Once it is secured, you trim the knot away.
All of this said, if you do use plain old knots to start and end your embroidery, the embroidery police will not come after you. It's okay to use the method that you're most comfortable with. Just consider how a piece will be used and how those knots might end up looking from the front.


Tegs:
Search
Recent Posts
Subscribe to Updates
Get the latest posts and fashion insights directly in your inbox.