How to Knit a Bag: A Step-by-Step Guide for Beginners
Knitting a Bag: A Fun and Easy Project for All Skill Levels
Knitting a Bag: A Fun and Easy Project for All Skill Levels
PATTERN INFORMATION
Recently I began naming my crochet and knit patterns after local New England places of interest. I couldn’t help but name this classic shoulder bag after the city that I grew up near, worked in for 10 years (inside the tall Prudential building!), and where I have enjoyed many memorable experiences.
The “Boston Shoulder Bag” is named after the city of Boston, Massachusetts, home of early American history and tradition. This city has such a rich past and pedigree, I knew the bag would fit right in. It’s a fun city to shop in, so I could imagine this bag used for a grab-n-go purse to hit the shops & cafes. The cotton cord provides interesting texture and sturdiness, while the leather straps and enclosure give it a timeless, classic look.
To achieve the jumbo sized knitting look in this particular bag, you could probably use size 50 knitting needles and jumbo yarn instead of what I used. However, you would need to line the bag to prevent items from falling through the gaps.
My shoulder bag has smaller and tighter stitches, but they still pack a big punch!
The free pattern for my version of the knit shoulder bag is provided below.
- but you can also get the ad-free, printable pdf pattern for the KNIT SHOULDER BAG in the ETSY SHOP! The pdf has step-by-step tutorial photos included, which will help you work the seam and add the leather straps and buckle.
On-the-Go Knit Bag
Perfect for toting all of your daily essentials, the On-the-Go Knit Bag is an active knitter's best friend. This tote-style knit bag pattern features a comfortable shoulder strap, front pocket for smaller items, and plenty of space in the main compartment for groceries, books, and other items. If you've ever wanted to learn how to knit a bag, now is the time to start with one of our favorite easy knitting patterns that you are going to love.
Knitting Needle Size 10 or 6 mm, 7 or 4.5 mm
Yarn Weight (4) Medium Weight/Worsted Weight and Aran (16-20 stitches to 4 inches)
Gauge 20 sts and 26 rows = 4" [10 cm] in stocking st with smaller needles.
Materials List
Instructions
Front and Back (make 2 alike)
With smaller needles, cast on 50 sts.
Knit 12 rows (garter st), noting first row is WS.
Change to larger needles.
1st row: (WS). K2. *yo. K2tog. Rep from * to last 2 sts. K2.
2nd row: Knit.
Rep last 2 rows until work from beg measures 11½" [29 cm], ending with a 1st row.
Next 2 rows: Knit.
Cast off knitwise (WS).
Side Panel (make 1)
With smaller needles, cast on 27 sts.
Knit 12 rows (garter st), noting first row is WS.
1st row: (WS). Knit.
2nd row: Purl.
Rep last 2 rows until work from beg measures 34" [86.5 cm], ending with a 1st row.
Knit 12 rows (garter st).
Cast off knitwise (WS).
Pocket (make 2)
With smaller needles, cast on 24 sts.
Knit 12 rows (garter st), noting first row is WS.
Change to larger needles.
1st row: (WS). K2. *yo. K2tog. Rep from * to last 2 sts. K2.
2nd row: Knit.
Rep last 2 rows until work from beg measures 6" [15 cm], ending with a 2nd row.
Next 2 rows: Knit.
Cast off knitwise (WS).
Finishing
With WS tog, stitch Side Panel to front along sides and bottom. Rep for opposite side. Sew WS of Pockets to RS of either side of Side Panel, matching bottom of Pocket to bottom corners of Bag. Cut webbing or ribbon for strap in half. Machine stitch or hand sew to bag along sides and bottom as shown. Rep for opposite side.
How to Start Knitting (with Advice from the Experts)
This article was co-authored by Gregory Patrick and by wikiHow staff writer, Luke Smith, MFA. Gregory Patrick is a knitter who runs the popular blog Madman Knitting. He is also the author of the book "Mad Man Knitting or The Waiter and the Fly". He has been knitting and writing about knitting for over 10 years.
There are 10 references cited in this article, which can be found at the bottom of the page.
This article has been fact-checked, ensuring the accuracy of any cited facts and confirming the authority of its sources.
This article has been viewed 3,987,932 times.
Blankets, scarves, sweaters, gloves, stuffed animals—there’s virtually no limit to what you can make with some yarn and a pair of needles. When it comes to knitting, once you’ve got the basics down, the only limit is your imagination (and maybe the occasional hand cramp). So we’re here to show you just that! We’ll guide you through casting on, knitting a row, and casting off, plus a few other handy stitches to get you started on your knitting journey.
Things You Should Know- Use chunky yarn and large needles to develop your grip and learn the basic stitches.
- Cast on by making a slipknot on a needle, then adding knots until you have the desired number of stitches.
- Knit stitches by slipping the right-hand needle up and through the cast-on stitches, then wrapping the yarn around the tip. Then, pull the yarn through the stitch.
- Cast off by knitting 2 stitches, then slipping the first stitch over the second, repeating until the end of the row.
Casting On
Tip: You may want to follow a beginner’s pattern when you are ready to knit your first project. Try making a dishcloth or a beanie for a quick and easy knitting project.
- The slipknot counts as your first cast on stitch, so make sure to include it if you are counting stitches.
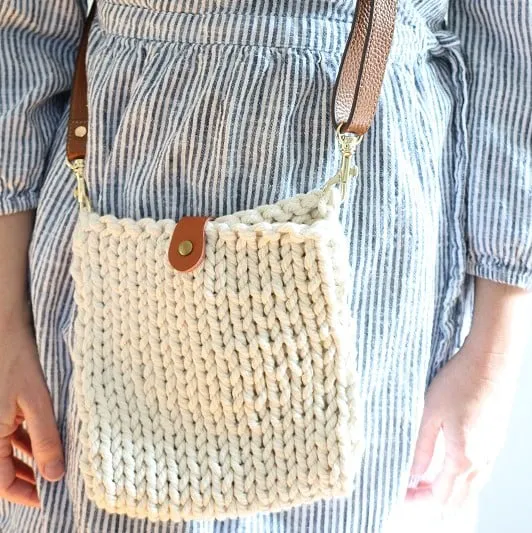
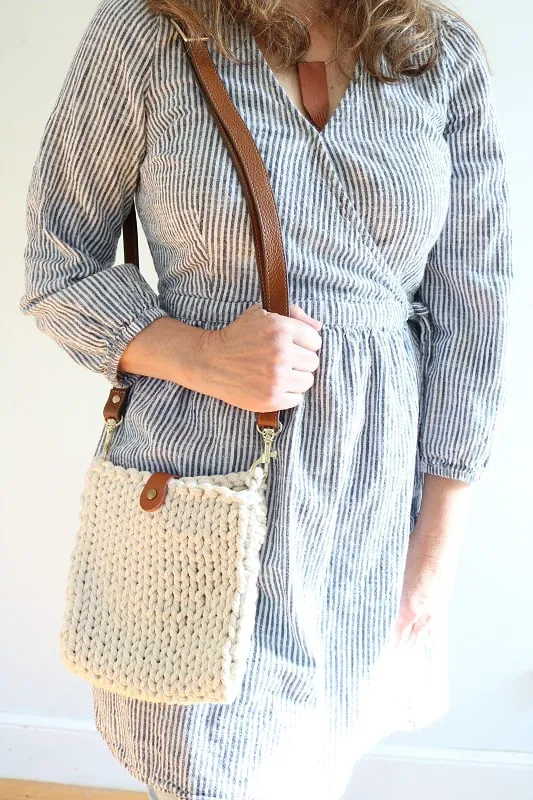
KNIT CROSSBODY BAG PATTERN
Gauge: 4″ (10cm) square = 7.5 sts by 11 rows (in stockinette pattern)
How do you make a chunky bag?
Follow instructions as follows…
Beginning with the Size 15 knitting needles , cast on 14 stitches with your MACRAME CORD.
Knit Shoulder Bag Pattern
Rows 3-42: Rep Rows 1-2.
Your purse should measure about 16” length at this point. Feel free to continue repeating Rows 1-2 if you would like a longer purse (more than 8” length).
Finishing the Shoulder Bag
Bind off knitwise.
Feel free to block your piece at this point if you want to straighten out the stitches and rectangle.
Seaming the Shoulder Bag
Use an edge-to-edge seam to join two sides of the purse together.
Repeat the seam steps for the other open side of the purse.
The digital pdf pattern includes steps and photos for how to work the edge-to-edge seam.
Weave in all loose ends on the Wrong Side.
Turn bag Right Side out.
Important Tips for Knitting your Bag
Some things to keep in mind as you knit the bag are:
- You may need to knit more loosely since the cord is thick.
- You should always have 14 sts per row.
- Make sure to use a wide-eyed needle for seaming & weaving in ends, since the cord is thick.
- You may need to secure any loose threads from the ends of the cord by sewing them to the inside of the purse.
Add leather straps
Attach the leather shoulder straps to the bag by simply clipping them to stitches on the sides of the bag.
Add leather snap buckle
You may wish to add a leather snap buckle to enclose the top of the bag, preventing items from falling out.

Tegs:
Search
Recent Posts
-
Chunky Knit Blankets: The Ultimate Guide to Cozy Comfort
Apr 13 2025
-
Learn to Knit a Thumb on a Mitten: A Simple and Effective Tutorial
Apr 14 2025
-
Hand-Knitted Bliss: Weighted Blanket Chunky Knit for Ultimate Relaxation
Apr 14 2025
-
Master the SSK: A Comprehensive Guide to Knitting the Slip-Slip-Knit Stitch
Apr 14 2025
-
Learn the Seed Stitch: A Beginner-Friendly Knit Scarf Pattern
Apr 15 2025
Subscribe to Updates
Get the latest posts and fashion insights directly in your inbox.