Creative Glass Craft Block Ideas: Unleash Your Inner Artist
Glass Craft Block Ideas: Inspiring Projects for Beginners and Experts
Glass Craft Block Ideas: Inspiring Projects for Beginners and Experts
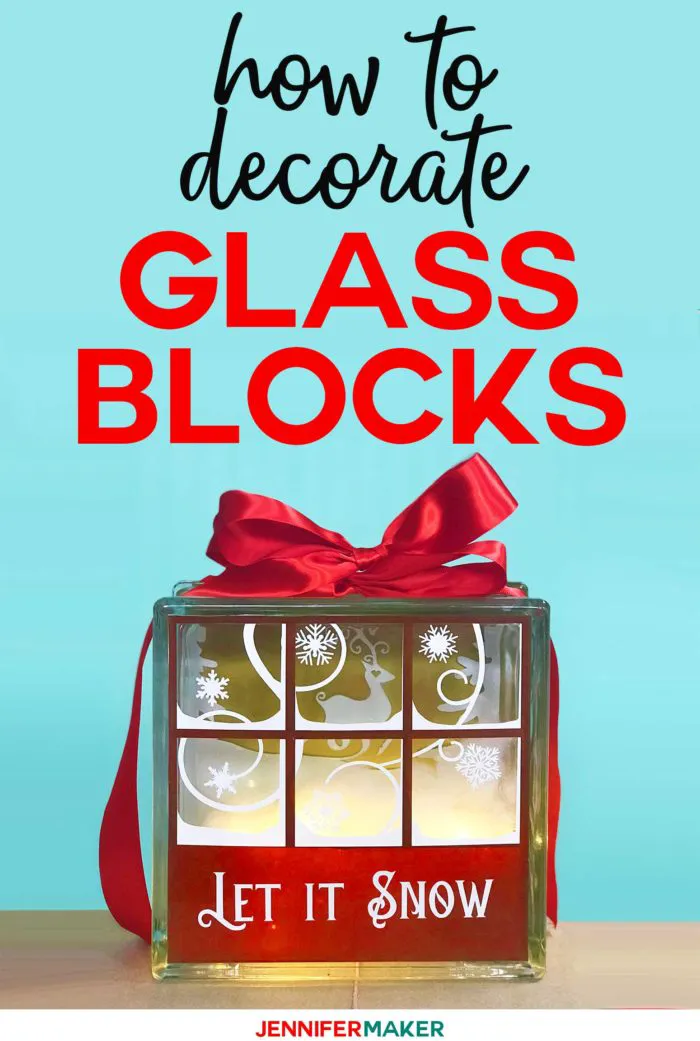
Decorated Glass Blocks with Vinyl & Lights
You can get these glass blocks at craft stores for about $12-15. Now you CAN also get glass blocks from home improvement stores, but they often do not have a way for you to get inside. And getting inside to put lights and decorations is one of the best things about a glass block! You can put little LED lights like these inside the blocks, or even stuff them filled with fake snow, some fiber fill, or even sand. Note: If you cannot find a glass block that is pre-drilled, this excellent tutorial explains how to drill a hole in glass block purchased from a home improvement store.
When you get a glass block, look for one with a smooth surface. The bumpy ones are harder to decorate. And you can decorate them in a lot of ways — many people paint them, but I think most people put vinyl decals on them. The glass is the perfect surface for self adhesive vinyl and there’s so many different ways you can do it.
For my glass block, I designed a snowy window. You can see the snow building up on the panes and the snowflakes are swirling about. And I took advantage of the glass to put an extra layer of vinyl on the BACK of the block, so when you look through the window, you see a forest scene. I designed this so YOU can decide how many snowflakes and what sort of forest scene you see through the window, as I’ve provided extra snowflake designs as well as a Santa sleigh and a snowman for you to decorate with.
I put “Let it Snow” on the front, but you could personalize this with your own name or saying. I’m going to show you how to do all of this, as well show you how apply your vinyl to the glass. You can get my snowy window free design in my resource library (sign up to get the password below).
Many thanks to the readers and viewers who requested I show how to make decorated glass blocks (Joyce A., Lee R., Kristy J., Brandi C., Judy, Sue M., Pamela O., Penny B., and Joyce A.). Each person who contributed this project idea will receive an extra entry for your idea (I am keeping track on this on my end). And don’t forget, you can suggest project ideas for this Challenge here and receive entries to win one of our awesome prizes, including a Cricut Maker!
Diorama
Dioramas are an exciting glass block craft project to create a unique display or even a model of a real-life scene. You could use a clear craft glass block to create mini replicas of houses, beaches, forests – anything you can think of!
To get started on your glass block diorama, you’ll need a craft glass block and items to create the diorama’s scene. Then, fill up your glass block with anything from miniature figures to sand and seashells. You could also use stickers, glitter or paint to give your project some extra flair. No matter what you choose, glass blocks are the perfect way to create a beautiful, one-of-a-kind diorama.
PART 1
How to drill a hole in a glass block
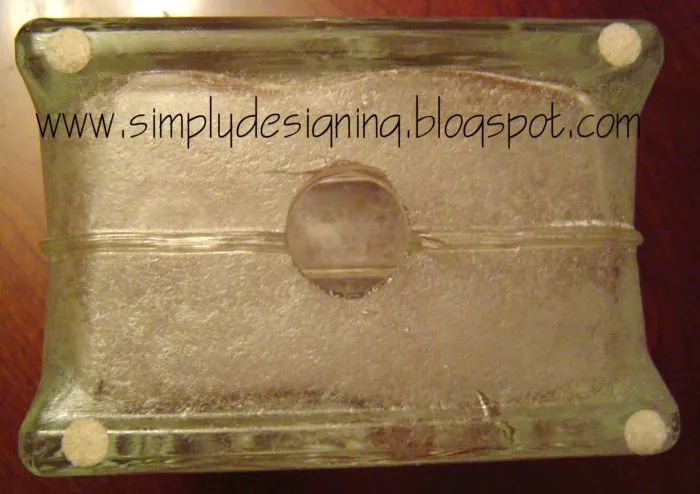
A “HOLE SAW” is a drill bit for making holes. It fits right into your cordless drill. You’ll want to get one that’s made for drilling glass and ceramic tile. It’s a common item at your local hardware store.
USE WATER. It’s important to drill with water, either by a trickle of water from the faucet that runs over your drilling point. OR by immersing the block under 1/4 inch of water. Why? The drill tip gets extremely hot under friction. It can cause glass to shatter. Therefore, the water acts as both a lubricant and cooling agent that keeps the tip cool in the drilling process.
I have drilled hundreds of glass and ceramic plates for making my dish flower garden art. Personally, I prefer to drill with my plate (or glass block) in the sink, under 1/4 inch of water.
How to start the hole
Lay the glass block face-down in the sink. Start your hole near the bottom and centered. Place the drill tip at a 45 degree angle against the block. SEE IMAGE BELOW:
Start the drill SLOWLY. At first, it will want to roll back and forth across the surface. Hold it steady for about 30 secs and you’ll be able to see and feel a little half-moon divot in the glass. Keep the edge of the drill tip in that groove until it grips and stays in place.
While the drill is running, slowly raise it to an upright position on the glass block. You’ll quickly have a circular groove to hold the drill tip in place for the completion of the hole. About 5-10 minutes depending on your drill.
After the hole is complete, drain water from the block. Don’t worry if you can’t get it all out, as it will evaporate in a day or two. Be sure to rinse the sink thoroughly as there may be some small shards of glass from the drilling process.
How to Make a Lighted Glass Block Snowman
And this lighted, glass block snowman is merry and bright. Although, at my house, they’re not just for Christmas, but all winter long!
This tutorial demonstrates the drill method for making the hole in the block to insert LED mini lights. Then, keep scrolling for decorating tips and ideas so you can embellish it with your favorite snowman ‘look’.
- PART 1 How to drill a hole in glass block for the lights
- PART 2 How to paint a great snowman face
- PART 3 How to make a felt top hat
At ‘Make it a Garden‘ we encourage readers to develop their creativity and learn new skills through DIY such as drilling glass and painting a face rather than using vinyl decals.
It’s all included here!

Tegs:
Search
Recent Posts
-
Decoupage Paper on Glass: Transform Ordinary Glass into Beautiful and Unique Creations
Apr 18 2025
-
Transform Glass Ornaments with Decoupage: Step-by-Step Guide
Apr 20 2025
-
Explore the exquisite world of artisan glass works, featuring unique and handcrafted pieces.
Apr 29 2025
-
Add a Touch of Charm: Macrame for Glass Fishing Floats
May 2 2025
Subscribe to Updates
Get the latest posts and fashion insights directly in your inbox.