Wood Carving Repair: Restore Your Cherished Pieces to Their Former Glory
Wood Carving Repair: Bring Your Carvings Back to Life
Wood Carving Repair: Bring Your Carvings Back to Life
How To Fit The Finish Coat To The Wood Furniture?
Now that we’ve gone over how to fix cracked wood furniture, let’s talk about how to fit the finish. In most cases, you will want to choose a finish that matches the rest of the piece. However, if you are trying to achieve a certain look, feel free to experiment with different finishes. Here are a few tips to help you choose the right finish for your project:
- If you are repairing a piece of antique furniture, you will want to choose a finish that is compatible with the age of the piece. For example, if the piece is from the Victorian era, you may want to choose a dark stain or varnish.
- If you are repairing a piece of modern furniture, you will want to choose a finish that is compatible with the style of the piece. For example, if the piece is made from stainless steel, you may want to choose a high-gloss finish.
- If you are repairing a piece of upholstered furniture, you will want to choose a finish that is compatible with the fabric of the piece. For example, if the piece is made from velvet, you may want to choose a low-gloss finish.
- These are just a few tips to help you choose the right finish for your project. If you’re still not sure which finish to choose from, we recommend taking a sample of the wood to a local hardware store for advice.
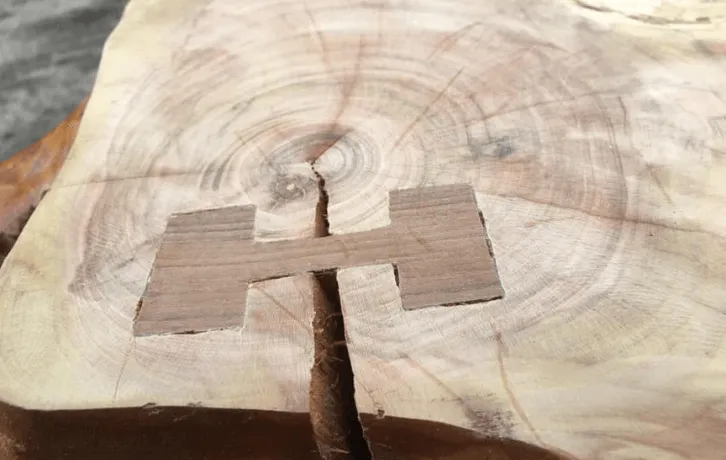
Step 3: Filling Cracks and Checks With Famowood Filler
Now that you have your sculpture situated on a drop cloth or expanse of newspaper to prevent messes.
Take a small amount of color matched famowood professional wood filler and a flexible pallette knife and begin filling any visible checks from top to bottom on the sculpture. It can be a bit awkward to work with initially but you will get a feel for the wood filler and techniques for good filling of holes and checks.
Always check your fills twice to make sure everything is up to snuff.
This is pretty much the toughest part of the instructable and the most time consuming, depending on how cracked the sculpture is. Be patient.
Once your sure all the checks or holes are filled flush with the wood let the Famowood cure and dry.
Seal your new statue with a protective coating.
Many pieces of wooden artwork have cracks due to temperature and humidity changes. To seal your carving, brush on several layers of lacquer. This thin coating will help keep moisture out of your carving and preserve it for years.
Make sure you sand lightly between coats for a smooth finish! If you don’t have lacquer, try using polyurethane or shellac instead. Depending on where you live, these options may be more flexible than lacquer. Whatever product you choose, ensure it has good durability (and isn’t water-soluble!) before applying.
Here are some materials that would work well:
- Rust-Oleum Ultimate Wood Stain is durable and weather resistant.
- Shellac from Minwax is highly rated and available at most hardware stores.
- Polyurethane from Minwax is also highly rated and available at most hardware stores.
- A fourth option might be tung oil. However, it won’t protect against rainwater, and its natural ingredients would breathe easier into your carving than chemical-laden commercial products like varnish or lacquer.
Use stain to cover up imperfections.
If you’re looking for a quick way to cover up unsightly cracks in wood carvings, consider using an oil-based stain. These stains provide more coverage than paint and blend seamlessly into your project.
You need some paintbrushes and a few hours to apply an oil-based stain. You should be able to conceal most cracks with two coats of stain. For areas that can’t be reached by brush—such as deep grooves—fill a syringe with stain, insert it directly into each crack, and inject it quickly.
Now let that sit overnight, and then clean off any excess staining fluid with nail polish remover or alcohol before finishing it with one final coat of water-based polyurethane. That’s all there is to it! Remember: oil-based stains smell pretty awful when they dry, so always set up fans in case fumes get out of hand. I usually put mine outside on my patio so neighbours don’t get grossed out!
Just remember that staining can also darken/change your carving and may not be a great option to preserve its condition or colour.

Tegs:
Search
Recent Posts
-
Wood Spirit Carving: Bring Nature's Magic to Life
Apr 14 2025
-
Discover the best wood carving classes in Indiana. Find workshops and courses for all levels, from beginners to experienced carvers.
Apr 14 2025
-
Discover the Art of Junior Cobb: Renowned Wood Carver
Apr 14 2025
-
How to Preserve Wood Carvings: Keep Your Creations Safe and Beautiful
Apr 14 2025
Subscribe to Updates
Get the latest posts and fashion insights directly in your inbox.