Easy Butterfly Embroidery Patterns: Beginner-Friendly Guides
Simple Butterfly Embroidery Designs: Stitch Your Way to Beauty
Simple Butterfly Embroidery Designs: Stitch Your Way to Beauty
Finishing the Back of the Embroidery
For displaying my work I decided to use a wooden display hoop and use the drawstring method for the back of my embroidery.
1. Start by cutting the excess fabric, leaving at least an inch allowance. To prevent the fabric from fraying you can use a zig-zag scissors.
2. Using 6 strands of thread stitch a Running Stitch until you complete the full circle. Tie both ends and cut the excess thread.
Congratulations! You have successfully completed this tutorial!
I really hope you enjoyed stitching this beautiful pattern and please let me know in the comments below if you have any questions or suggestions.
The downloaded pattern can only be used for personal projects. You can read more about my Free Pattern Library here. Happy stitching, lovelies!
Similar Embroidery Projects
- Sakura Tree Embroidery Decoration Tutorial
- Daisies Embroidery Decoration Tutorial
- Cherry Blossom Tutorial Free Embroidery Pattern
- Realistic Butterfly Needle Painting Tutorial
SAVE THIS FOR LATER? ADD THE BUTTERFLY GARDEN TUTORIAL TO YOUR FAVOURITE PINTEREST BOARD
Sharing is caring!
About Gabriela Statie
I’m Gabriela, the founder of Makenstitch. As a designer with over 15 years of experience, I’m passionate about teaching and creating beautiful things. Based in a cozy Northern Ireland town, I get to live my love for crafting and sharing projects every day with my lovely readers.
Get
your weekly inspiration.
Stitching the Pattern
For stitching each butterfly we’ll be using the same method. We’ll first outline the shapes using Split Stitch, then fill them with Long and short or Satin Stitch. Let’s have a look at each butterfly and the order of work.
1. Start by outlining the first butterfly with Split Stitch, using DMC 3371 (Black Brown)
2. Continue by filling the side areas with Satin Stitch, using DMC 3371 (Black Brown)
3. We’ll fill the wings using Long and short stitch. Start from the outside stitching the first row using DMC 813 (Blue Light)
4. Continue stitching the second row using DMC 162 (Blue Ultra Very Light)
1. Start by filling the pink details with Satin Stitch using DMC 892 (Carnation Medium)
2. Outline the butterfly with Split Stitch using DMC 3371 (Black Brown)
3 Continue filling the outer wings with Satin Stitch using DMC 3371 (Black Brown)
4. Add the lighter details using Satin Stitch and DMC 543 (Beige Brown Ultra Very Light)
5. Continue filling the dark areas with Satin Stitch using DMC 3371 (Black Brown)
6. Go on and fill the right wing dark areas with Satin Stitch using the same DMC 3371 (Black Brown)
Stitching the Pattern
Note: For the entire work I used ANCHOR threads. If your brand of choice is DMC, please use the conversion chart above.
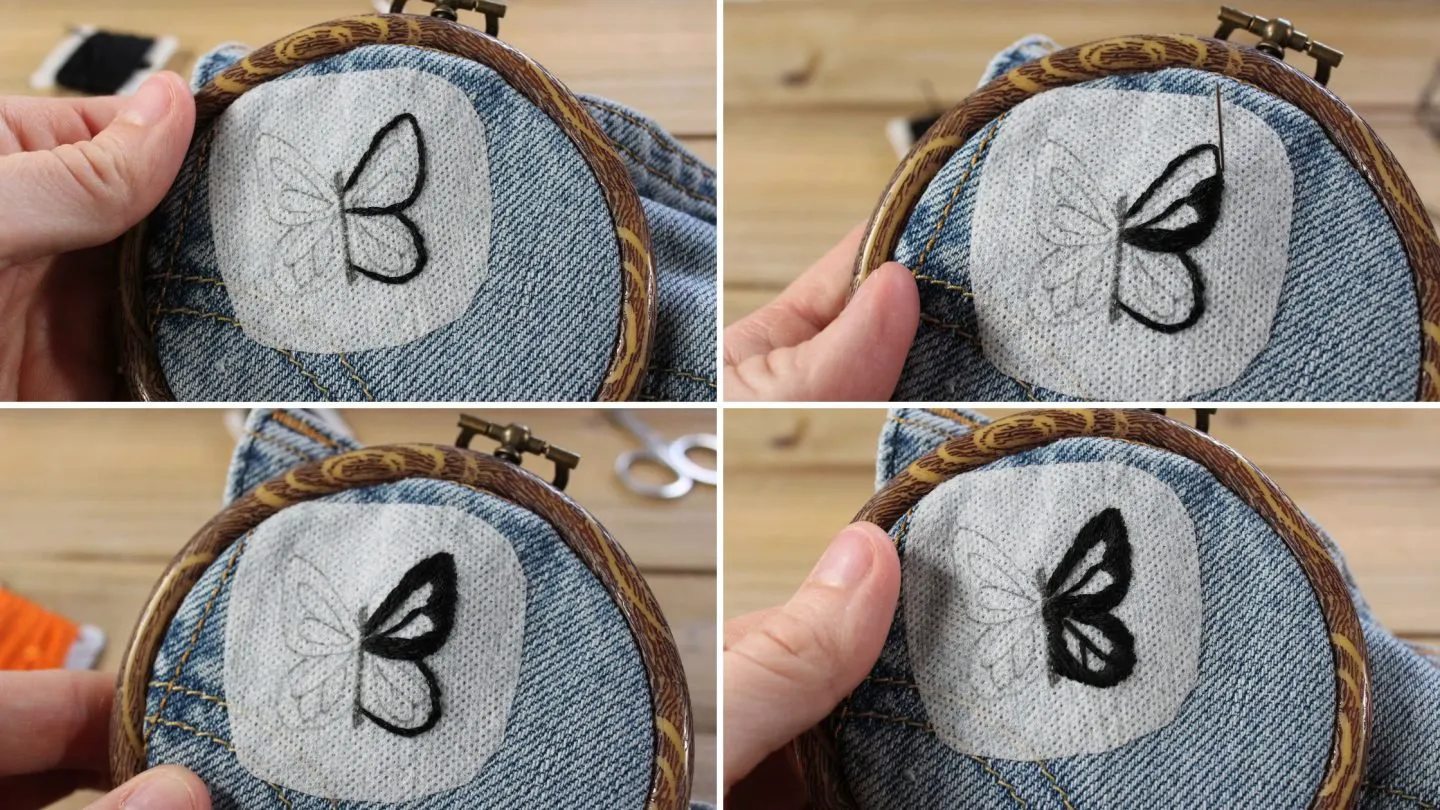
1. Start by outlining the white butterfly with Split Stitch using ANCHOR 403 (Black)
2. Fill in the spots with Satin Stitch using ANCHOR 403 (Black)
3. Fill in the wings with Long and Short Stitch using ANCHOR 2 (White). Work your way from the outside toward the inside shapes.
4. Fill the body with Long and Short Stitch using ANCHOR 2 (White). Work your way from the bottom toward the head.
5. For the green butterfly we’ll use the same process. Start by outlining the butterfly with Split Stitch using ANCHOR 403 (Black). Leave the bottom part for later, that area will be filled with the Long and Short Stitch.
6. Fill the wings with Long and Short Stitch. Start for the outside of the shape using ANCHOR 875 (Celadon Grn Light), then continue shading using ANCHOR 1070 (Teal Grn Light).
7. When done stitching the wings, fill in the body with Long and Short Stitch using ANCHOR 1070 (Teal Green Light). Same as before, work your way from the bottom toward the head.
37 Gorgeous Butterfly Embroidery Pattern Ideas
All of this makes the butterfly a great subject for embroidery!
Butterfly embroidery patterns aren’t difficult to make at all! You can use any filling stitches to fill in the wings, and you can use almost any material as well! Felt, sequins, beads, and ribbons can all look fabulous in your project. While stitching designs always vary in difficulty, there are several tutorials and easy patterns available to choose from to help you get started.
Here are some fantastic butterfly embroidery patterns that I’ve come across in my recent obsession!
I particularly love the bright monarch patterns, as well as those that incorporate flowers. And all are great for gifts!


Tegs:
Search
Recent Posts
Subscribe to Updates
Get the latest posts and fashion insights directly in your inbox.