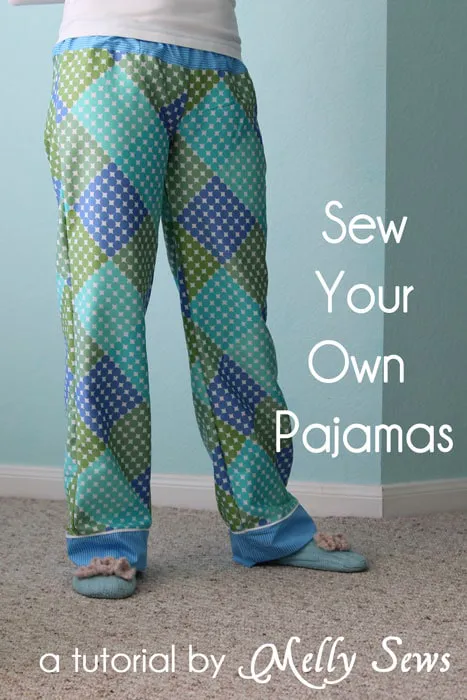
Sewing Pyjama Pants: A Step-by-Step Guide with Tips and Tricks
Sewing Pyjama Pants: Create Cozy and Comfortable Sleepwear
Sewing Pyjama Pants: Create Cozy and Comfortable Sleepwear
STEP #4: Cut Out the Fabric
Let’s move on to cutting out the fabric for our PJ pants.
Your knit fabric should be washed and dried before you cut it out. This will help to preshrink the fabric and prevent the color from running.
Lay the fabric out in front of you. I’m going to start out by cutting out my front PJ pieces. You need to cut two pieces and they should be mirrored images. You can easily do this by folding the fabric in half, laying the pattern piece on top and then cutting it out.
Refer to the pattern download instructions for a fabric layout chart.
Repeat this same process for the back pieces.
Make sure to transfer any marking for the pockets from the front and back patterns to the fabric.
Now, move on to the pockets. You will need 2 sets of mirrored images.
Finally cut out your waistband.
Now that all of your fabric has been cut out, it’s time to cut out your interfacing. You will need 8 strips of lightweight interfacing cut to .5” x 15.5”
Refer to the elastic chart and cut out your elastic. I’m going to cut out 23”.
Step 1: Gather Your Supplies
To make sure you get the right size, just make sure you have a pair of pants that fit the intended pajama wearer. If your pajama wearer is far away, then find out the right size and borrow some pants from someone who is that size or carry yourself down to the Salvation Army and part with a couple of your increasingly precious dollars for a busted-up pair you can use as a pattern. This is a DIY tutorial and I figure anyone smart enough to sew up some pajama pants is also smart enough to find some in the right size but you never know.
Fabric - woven cotton or flannel or jersey or whatever floats your boat. The exact amount you need will depend on how big the pants are and whether the print is directional or not. If you are an experienced sewer, you know what that means and you can skip the next bit or you can read it and think, "Well, duh." A directional print is one that has a right-side up. Like words or Christmas ornaments or something else that is meant to hang only one way. If you're making adult pants and using a directional fabric that's a standard 44" wide, you will need almost twice as much fabric because you can't save fabric by flipping the pattern around and cutting one leg upside down. If you don't buy extra fabric and move the pattern down along the same fold to cut the second leg, your husband's cheesy Christmas pajamas will be even more cheesy because the aforementioned Christmas ornaments will be hanging down properly on one leg and, in total defiance of gravity and common sense, hanging UP on the other leg. (Sorry, dear.) To use the smallest amount of fabric possible on your "lounge" pants, buy a cute print that looks the same turned any direction.
You'll also need thread to match, pins, paper to make the pattern, a pencil or pen, scissors, a safety pin, and enough elastic to go around the waist of the wearer plus about five inches. What kind of elastic isn't all that important but it should be about 1 / 2 inch wide.
Step 1:
The secret here is to NOT cut out a particular size; instead, just trace off the size you need. I’ve used inexpensive taped-together white tracing paper from Hobby Lobby and traced the sizes I needed. That leaves me with all of my pattern sizes and styles still intact.
There’s really not much to cutting out the PJ Pants. You are cutting out two Front and two Backs.
Once the pattern is cut out I strongly suggest that you label the Front and Back pieces with some sort of removable sewing marker.
Step 5:
You will need to form a casing for the elastic at the waist. To do this fold the upper edge 1 1/2″ towards the inside. Press under the raw edge 1/4″

Tegs:
Search
Recent Posts
-
Owl Sewing Pattern: Bring a Touch of Wisdom and Whimsy to Your Sewing Projects
Apr 14 2025
-
Sewing Machine Needles: Understanding Sizes and Choosing the Right One
Apr 14 2025
-
Sew Leather Like a Pro: The Best Sewing Machines for Leatherwork
Apr 14 2025
-
Gym Bag Sewing Pattern: Create a Personalized and Practical Carry-All
Apr 14 2025
Subscribe to Updates
Get the latest posts and fashion insights directly in your inbox.