Quilling Board Instructions: Master the Art of Paper Quilling
Unlock the Secrets of Quilling: A Guide to Using a Quilling Board
Unlock the Secrets of Quilling: A Guide to Using a Quilling Board
Paper Quilling Tips For Beginners
All beginners make mistakes because the skill is unfamiliar to them. But your quilling journey will be much easier if you practice the basic tips, use premade patterns, and use a circle sizing board.
Keep reading to find out more quilling tips for beginners.
Practice The Basic Shapes
Getting the basic shapes down pat will save you a lot of frustration as you start making more complicated patterns.
As mentioned, the basic shapes are heart, marquis, teardrop, open coil, closed coil, spiral, c-scroll, and s-scroll.
Use Premade Patterns
Premade quilling patterns are great for beginners. You can download them online free of charge or purchase the patterns of your choice at an arts and crafts store.
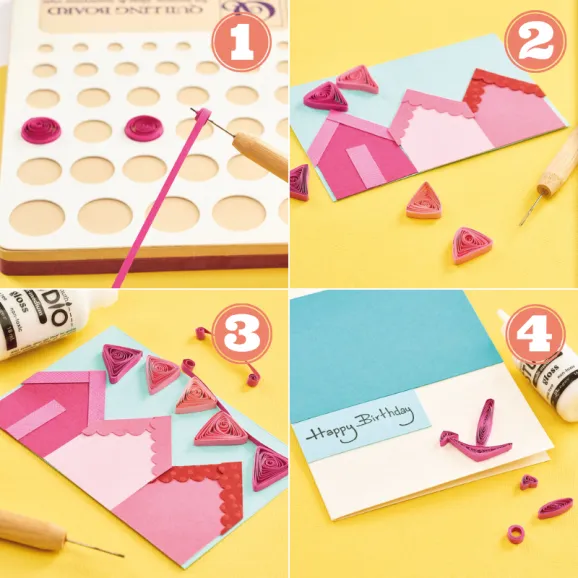
Use A Circle Sizing Board
Some beginners find it difficult to get the size right. This is where a circle sizing board comes in handy.
It’s a plastic board with predrilled holes in different sizes and shapes. Once you’ve made your shape, place them in the holes and gently spread out the middle until you get your desired shape and size.
Use An Acetate Sheet
An acetate sheet will provide stability for your quilled shapes. Develop your shape on the acetate. Once the glue has dried, you can remove your shapes without any damage.
Use A Light Touch
It’s tempting to use a lot of glue and to press down forcefully to ensure everything sticks properly.
However, this is a bad idea. Excess glue will destroy your project, and pressing down too forcefully will ruin the shape.
Use a tiny bit of glue, and press down lightly. You may need to repeat the process a couple of times to get the required shape and get the paper to stick.
Have A Damp Cloth Ready
With all the gluing required, paper quilling can get messy. So that you don’t unintentionally ruin your project, have a damp cloth available so you can wipe the glue off your hands.
Prevent Uneven Coils
When your pieces are drying on your work board, making sure they’re all level is difficult because you’re not going to sit there and watch them dry, and if a section pops up, you won’t notice.
How to Make a Fan-Shaped Husking
Below is how a huskings pattern looks like with the aid of a paper quilling grid template.
After you have made lots of paper quilling coils and huskings, you can start to arrange them to create an interesting quilled design for display. Use glue to stick the coils and huskings to the drawing paper.
You can buy a paper quilling grid board that comes with pins that are stored in a little compartment on the board. It is a great tool to have for making huskings. The price for a grid board is affordable, too!
How to Make Paper Quilling Huskings for Flowers? What Is a Husking?
Huskings are commonly found in paper quilling art designs. This article will help you create more designs with quilling paper to make quilled huskings. Huskings are often used as flower petals in floral quilling designs but they can be used in any project. They are made by shaping one or more strips of quilling paper around a series of pins. Huskings can have various shapes and sizes, and more than one colour.
An easy shape to make is a straight husking. You need some strips of quilling paper, dressmaking pins, a quilling cork board and craft glue to make a straight husking.
Insert five pins into a quilling cork board, with the pins aligned in a straight line. Wrap a quilling paper around the first and second pins and glue the paper together where the strip overlaps at the first pin. Continue wrapping the paper strip around the third, fourth and fifth pins.
Glue the end of the paper at the first pin and trim off the excess paper. Remove the pins. You can leave the loops rounded as they are, or shape them by pinching one end of the loops with your fingers. Use a little glue on the paper strip to strengthen the husking and retain its shape.
Straight huskings have variations by using different numbers of pins aligned at different distances.
This quilling paper husking board is a thin, plastic rectangle, measuring about 6 inches long by 3 inches wide.
It’s covered in small holes. The top section is an arch pattern; the bottom is straight lines.
There is also a small drawer to the side, that holds 32 sticks to use in the holes along with your quilling paper.
I did like the little drawer, but I found that it does get stuck somewhat when I would try to push it back in.

Tegs:
Search
Recent Posts
-
Quilling Earrings: Create Stunning Jewelry with Simple Designs
Apr 14 2025
-
Letras de Quilling: Tutoriales y Técnicas para Principiantes
Apr 14 2025
-
Paper Quilling Essentials: Choosing the Right Glue for Your Projects
Apr 14 2025
-
Quilling Wall Hanging: Create Unique & Elegant Wall Art with Paper Quilling Techniques
Apr 14 2025
Subscribe to Updates
Get the latest posts and fashion insights directly in your inbox.