French Knot Embroidery for Beginners: A Step-by-Step Guide
Master the French Knot: A Detailed Guide to Sewing Perfect Knots
Master the French Knot: A Detailed Guide to Sewing Perfect Knots
5 Tips for Foolproof French Knots
Oh, those naughty knots! The French knot is one of those hand embroidery stitches that is either your best friend or your worst enemy. Some people love ’em, and some people hate ’em.
If you have trouble with French knots, try these five tips for foolproof French knots. You’ll find yourself a happy knot-maker in no time!
The French knot is a lovely and versatile little stitch. Clustered together, French knots create a dense, textured filling. Scattered loosely, they add an airy lightness to embroidery. And as isolated stitches, they make perfect little accents.
But the French knot can be difficult to conquer. So much can go amiss in the process of making that one tiny stitch!
5 French knot tips
Here are five tips to help you achieve consistent, successful results with your French knots:
1. Don’t wrap the thread more than three times around the needle.
A French knot made with more than three wraps can become ungainly as you finish the stitch, creating inconsistent results as far as size goes, its loops can end up loose, and the whole knot can end up sitting loosely on the fabric, to be snagged or displaced later.
If you want a really big, textured knot-like stitch that sits up high off the fabric, try a drizzle stitch instead.
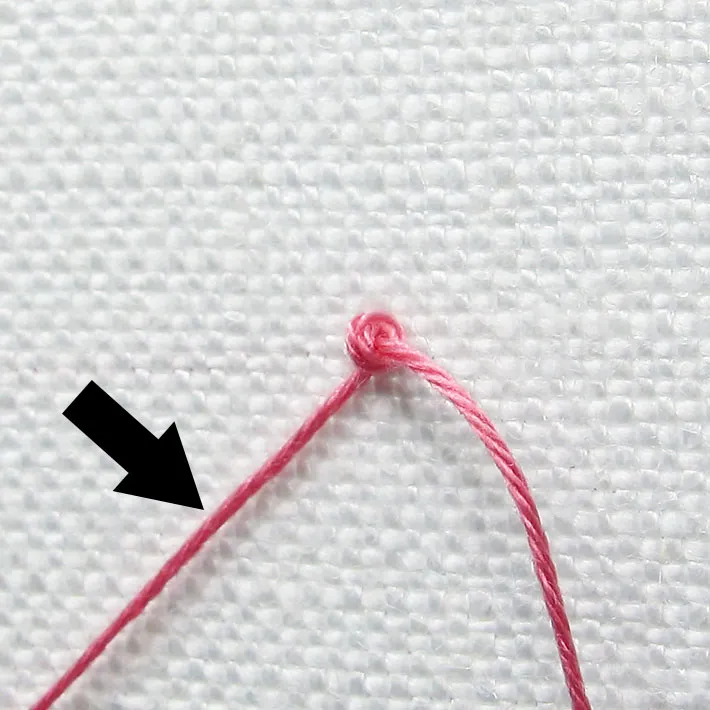
2. Leave a small space between the beginning of the stitch and the place where you take the needle down into the fabric.
This will ensure that your knot does not pop to the back of the fabric.
3. Pull the thread slowly through the wraps to the back of the fabric, so that the thread does not knot up on itself.
Those little slip knots that form in thread are just waiting to happen if you pull the working thread quickly. Often, with French knots, any additional knotting of the thread results in having to cut the thread. So go slowly until you’re really accustomed to making successful French knots!
4. Keep the working thread under tension until the last possible moment as it passes to the back of the fabric.
This will not only eliminate the chance of any extra slip knots forming in your thread, but it will keep your wraps in place, tight around the thread.
5. Try a milliner needle.
Although French knots can be successfully worked with regular embroidery needles, if you really have trouble with them, consider trying a milliner needle. A milliner needle has an eye that is the same thickness as the shaft, making it easy to pass the needle through the tight wraps without getting hung up on the eye.
Leave a comment or question to this video
How to make a decoration knot
In this DROPS video we show how to make a knot to be attached as a decoration to a Santa that is worked on a jumper. The same technique is also used to make a star at the top of a Christmas tree jumper. KNOT: Make a knot at the top of every Santa hat/ Christmas tree. Tie the knot around a stitch. Cut 2 lengths of colour off white. approx. 10 cm. Place strands together, use a needle and pull strands through the top off white stitch so that both yarn ends are on the right side of piece, on each side of stitch. Tie a knot, then tie another knot but in the opposite direction. Cut the yarn ends approx. ½ cm (Santa) / 1 cm (Christmas tree) long. These jumpers are worked in DROPS Air but in the video, we work with a thicker yarn; DROPS Snow., You must read the pattern to be able to follow this video properly. You’ll find a pattern by clicking on one off the picture below.
How to sew / embroider twisted chain stitch
In this DROPS video we show how to sew / embroider twisted chain stitch. Insert the needle from the wrong side and through to the right side where you would like the chain stitch to begin. * Thread the needle down through the hole the strand came up through, then to the right side again approx. 2 cm further on – allow the strand to lie in a loop around the tip of the needle. Pick up the loop and twist it 2-3 times before laying it down again under the tip of the needle. Pull the strand through carefully, so the stitch is neat. If you want more stitches in height, repeat from the *. Finish by thread the needle through the piece approx. 0.5 stitches in front of the loop and pull it through to the wrong side. We use the yarn DROPS Snow in the video. You must read a pattern using this technique to be able to follow this video properly. You’ll find a pattern by clicking on one of the pictures below.
How to sew / embroider flat stitch
In this DROPS video we show how to sew / embroider flat stitch. Insert the needle from the wrong side to the right side, where you wish the stitch to start. Skip 0.5 - 1 cm and thread the needle down and up again to where you want the next flat stitch to start, pull the strand through. Skip 0.5 - 1 cm and thread the needle down and up again to where you want the next flat stitch to start, pull the strand through. Continue like this until you have enough stitches. We use the yarn DROPS Snow in the video. You must read a pattern using this technique to be able to follow this video properly. You’ll find a pattern by clicking on one of the pictures below.
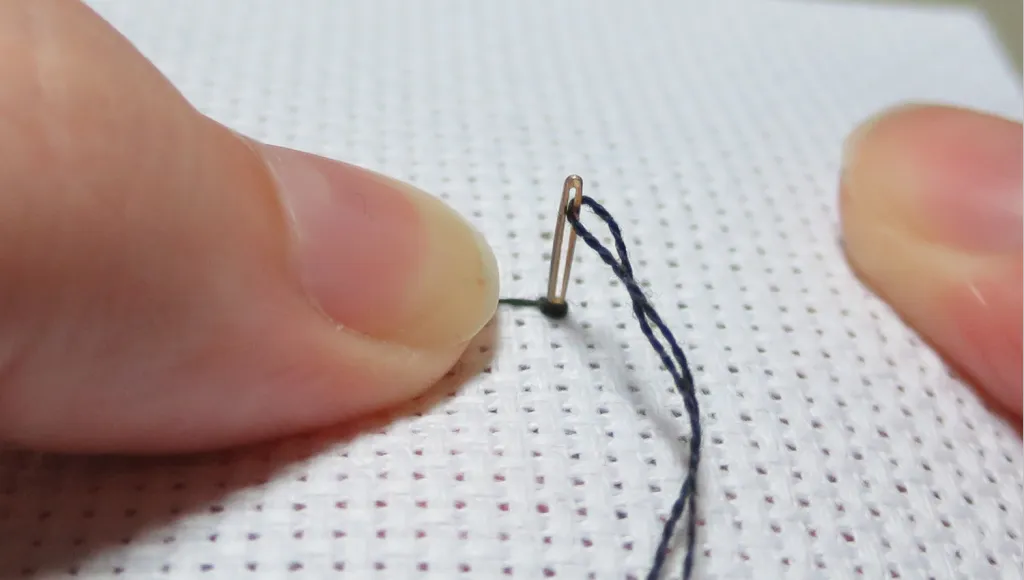
Step Three:
(I don’t have very clear pictures of this step; they were very hard to take! I had to set a timer on the camera and everything.)
You’re already halfway there to making a French Knot. Now, put your needle to the fabric as if you were going to go back through the hole, but don’t. Instead, take your needle and move up (or down) one thread on the Aida fabric and poke your needle through that strand. Do NOT go through the original hole! Like this:
Step Three: Poke hole in fabric with needle like shown.
(I actually went two threads down instead of one in the picture. It will show a little bit of black thread when you’re finished if you do this. It’s fine to do if there are crosses around it as you would never see the extra black thread.)
Poking a new hole between the threads will require a little bit of fiddling on Aida fabric, but just keep separating and pushing with your needle until you get it. Once you have it, push in with your needle far enough that you can grab it from the other side, but not all the way.

Tegs:
Search
Recent Posts
-
Knitting French Knots: Easy and Elegant Knots for Your Projects
May 1 2025
-
Embroidery Made Easy: Learn the Techniques of the French Knot Stitch
Jun 18 2025
-
Elevate Your Look: French Braids with Curly Weave for a Stunning Hairstyle
Apr 14 2025
-
Create a Cuddly Amigurumi French Bulldog: A Detailed Pattern Guide
Apr 15 2025
Subscribe to Updates
Get the latest posts and fashion insights directly in your inbox.