How to Crochet a Bumble Bee: A Step-by-Step Guide
Learn to Crochet a Adorable Bumble Bee: A Detailed Step-by-Step Tutorial
Learn to Crochet a Adorable Bumble Bee: A Detailed Step-by-Step Tutorial
Get the Full Written Pattern for FREE
Please note, this pattern is created for your personal use only. The downloaded pattern should not be used for commercial distribution under any circumstances.
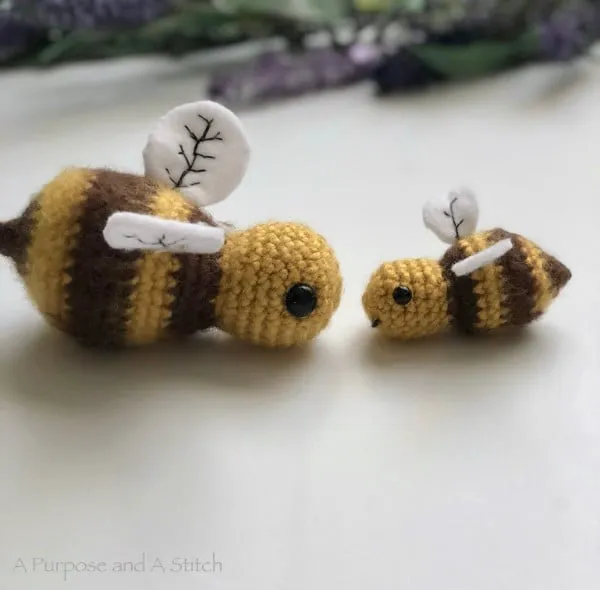
Perhaps I am partial, but I think that this is a great pattern to use to make an adorable bee as your next crochet project. This little guy is super cute and simple to make, it’s the best of both worlds!
Thank you so much for stopping by! I hope that you enjoy this crochet bumble bee pattern. When you make this little guy, make sure to send me a picture on social or comment below!
Block Stitch Blanket Tutorial (Easy Crochet Pattern!)
What to Crochet Next…
Get the Crochet Made Quicker Guide.
How to Crochet a Bee (Step by Step)
Yield: 1 Crochet Honey BeePrep Time: 5 minutesActive Time: 1 hour 20 minutesTotal Time: 1 hour 25 minutesDifficulty: EasyThis is a simple free crochet bee pattern that you can use to customize and create your very own pattern. Grab your hooks and yarn and lets start making!
Materials
- 1 skein of any weight yarn in yellow, black & white (use any color and have fun!)
- 4-weight yarn, embroidery floss or a 3 weight yarn to create the smile (I used the same yarn to make my smile.)
- 8-16 mm safety eyes (depending on the size you make, play around with different sizes to find the one you like best)
- Toy stuffing
Tools
- Size 4.5 mm crochet hook (USA 7)
- Scissors
- Tapestry needle
- Stitch marker
Instructions
How to Crochet a Bee
Step One: Make the Body -
Step Two: Attach the eyes -
- Before you finish out your body, you want to add stuffing and attach your eyes. In my pattern crochet honey bee pattern (
Step Three: Crochet the Bee Wings -
- The wings are created in the same manner as the start of the body. First, create a magic circle, and crochet 8 single crochet or half double crochets into the circle. Continue crocheting 2 stitches in each stitch around until your wing is the size you'd like (follow the basic bee wing pattern to help)
Step Four: Attach the Wings
- Using a tapestry needle, sew the wings on the yellow stripe between the black stripes (using a whip stitch). You can leave a few inches between the wings, or bunch them close together. See this crochet bee pattern video tutorial for more details.
Step Five: Stitch on the Mouth
- Creating a cute smile uses a bit of embroidery. Refer to the Amigurumi Bee Crochet Tutorial for creation the mouth or refer to the picture tutorial in the Honey Bee Crochet Pattern.
If you want to spice it up a little, you can use small cut pieces of pink felt to add some blush underneath the eyes, or crochet a small circle (magic circle, sc 6 into circle, next sc 2 in each of round 1 sts, leave a long tail to sew on to the bee)
Tips for Crocheting Amigurumi Bees
Here are some tips and tricks for crochet bee amigurumi success!
Use stitch markers to track your rounds.
Not surprisingly, these round little creatures are usually crocheted in the round! Using stitch markers is an easy way to keep track of the start of the round as you crochet. They’re easy to use, and can save you from making mistakes.
Use a smaller-than-usual crochet hook to create a tight fabric.
Consider embroidered eyes instead of safety eyes or buttons.
Safety eyes or buttons are a cute option for crocheted bees, but despite their name, they’re not actually “safe” for little ones. Safety eyes can fall off your amigurumi if pulled on, which makes them a choking hazard for children under 3. If your bee will be going to a home with little ones, your best bet is to embroider the eyes instead.

Tegs:
Search
Recent Posts
-
Zara Cream Crochet Dress: Embrace the Beauty of Crochet with this Stunning Dress
Apr 13 2025
-
Cozy Up Your Car: Crochet a Steering Wheel Cover with this Easy Pattern
Apr 13 2025
-
Make a Cozy Pot Holder with This Free Crochet Pattern
Apr 13 2025
-
Crochet a Cozy Scarf in a Day: Easy Pattern for Beginners, Perfect for Gift-Giving
Apr 13 2025
Subscribe to Updates
Get the latest posts and fashion insights directly in your inbox.