Finger Knitting Stuffed Animals: Easy & Fun DIY Projects for Kids & Adults
Create adorable finger-knitted stuffed animals! Easy and fun DIY projects for kids and adults alike.
Create adorable finger-knitted stuffed animals! Easy and fun DIY projects for kids and adults alike.
Before we begin… let’s get Social!
1. Little Mishka
For an extra soft and snuggly teddy bear, choose faux fur yarn. They can be a little trickier to work with, but the final result is totally worth it! This free knit stuffed animal pattern is worked mostly in the round, using only knit stitches.
Designer: Emily Kintigh for Knit Picks
Yarn: Knit Picks Fable Fur (Bulky Weight #5)
2. Tiny Chickens
These chickens are so small that they can balance on an egg. Or how about putting one inside an egg for a sweet Easter surprise? You can make these teeny tiny knit chickens in no time and with very little yarn. Hello scraps basket!
Designer: Mochimochi Land Website
3. Hedgehogs
My least favorite part about free knit stuffed animal patterns is joining all the pieces. Let’s just say my makes tend to look a bit more Picasso than pretty. That’s why this one piece, no-sew hedgehog design is pure genius!
Designer: Purl Soho
Yarn: Cascade Yarns Eco Cloud (Aran Weight #4)
4. Dinosaur Jr.
Dinosaurs don’t have to be green! I love free knit stuffed animal patterns that use unexpected colors. This adorable dinosaur can be made in any color combination you can think up! This design is worked in the round.
Designer: Katie Boyette
Yarn: Cascade Yarns ® Cascade 220® (Worsted Weight #4)
5. Magic Loop Teddy
Designer: Simply Notable LLC
Yarn: Malabrigo Yarn Rios (Worsted Weight #4)
6. Opus the Octopus
How To Knit A Stuffed Animal Easy
In this comprehensive guide, you’ll learn everything you need to know to knit your own stuffed animal, even with minimal knitting experience.
Finger Knit Butterflies:
- Yarn – doubled up worsted weight or a bulky yarn
- Pipe Cleaners
- Pencil
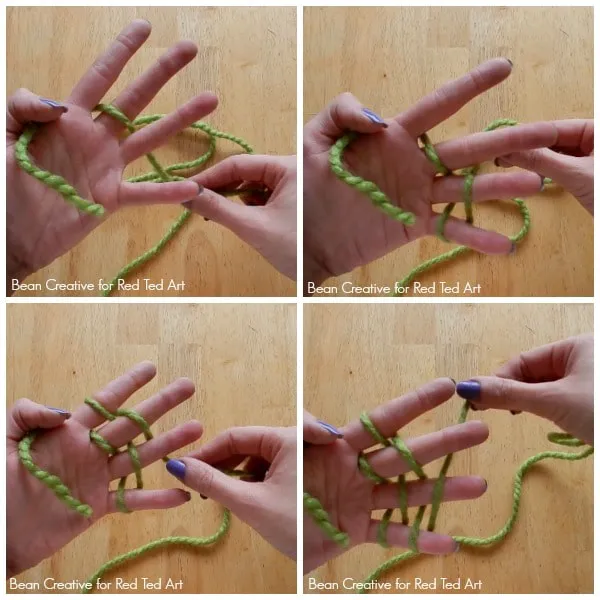
Begin by finger knitting two separate ropes of yarn. For one start with 120 inches and for the other rope use a 70 inch long piece of yarn. These will be the wings of the butterfly. Ropes will vary in size a bit depending on the size of fingers and the weight of the yarn used.
You can use the same color yarn for both wings or do two different colors. Don’t pull the chain tightly after it’s done. You can pull on it to shape it, but don’t tug too hard, just a little.
Once you have the wings of your butterfly finger knit, finish them off and tie the two ends together in a circle. Knot yarn.
Stack the two small circles on top of each other.
Wrap the yarn tail around the centers. Tie tightly to create wings. Tie the top to create a hanging hook or cut off if you don’t want to hang the butterfly.
Fold a pipe cleaner in half and wrap around the butterfly in the center. Twist the top.
Use a pencil or marker to roll the pipe cleaner to create round antennae.
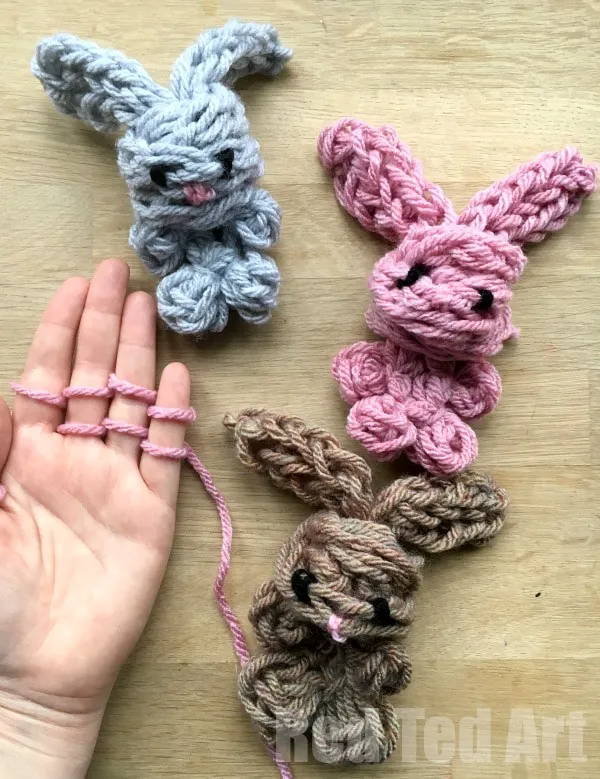
Easy Finger Knitting Bunny DIY
But then we are bias as we came up with this no sew finger knitting bunny pattern. And we think it is oh so cute! Depending on your kids age and dexterity, this is either a together project (they knit, you assemble) or should be able to manage it all by themselves. I give a little pointer in the video as to how to finish it off more easily if you need to simplify the facial features! But I would say that is the only really tricky bit. If you love this bunny.. to check out all our other cute and easy Bunny Crafts for kids!
So… let’s take a look what you need to make your finger knitting bunny rabbit and how to make it!

Tegs:
Search
Recent Posts
-
Easy Finger Weaving for Beginners: Simple Patterns & Techniques
Apr 27 2025
-
Crochet Finger Guard: Essential Tool for Comfortable Crocheting
Apr 28 2025
-
Finger Knitting Ideas: Unleash Your Creativity with Simple and Satisfying Projects
May 3 2025
-
How to Finger Weave with Yarn: Learn the Basics of Finger Weaving
May 6 2025
Subscribe to Updates
Get the latest posts and fashion insights directly in your inbox.