Cretan Embroidery Stitches: Techniques & Instructions
Mastering Cretan Embroidery: A Guide to Beautiful Stitches
Mastering Cretan Embroidery: A Guide to Beautiful Stitches
Stitch Floral
New month, new stitches! Today and few next days let's take a look at cretan stitch and some of its variations as well as herringbone stitch and romanian couching. I tried to group them together based on the fact that they are often used in crewel embroidery as a filling technique and also they are quite popular for working leaves and similar shapes.
Cretan stitch will be quite easy to conquer if you are already familiar with fly stitch and feather stitch because the technique is very similar. So if you forgot them, it's time to refresh your memory and make few practice stitches.
Variations
Closed Cretan Stitch
The stitches can be spaced out as little or as much as you want. To make the area look more solidly filled in (closed cretan stitch), all you have to do is make each stitch directly below the last.
Another thing you can play around with is the space between each of the marked lines. You could mark the fabric so that the space between lines 2 and 3 are wider and the space between lines 1 and 2, 3 and 4 and smaller so the center stitches are more prominent and the “legs” of the stitches are shorter.
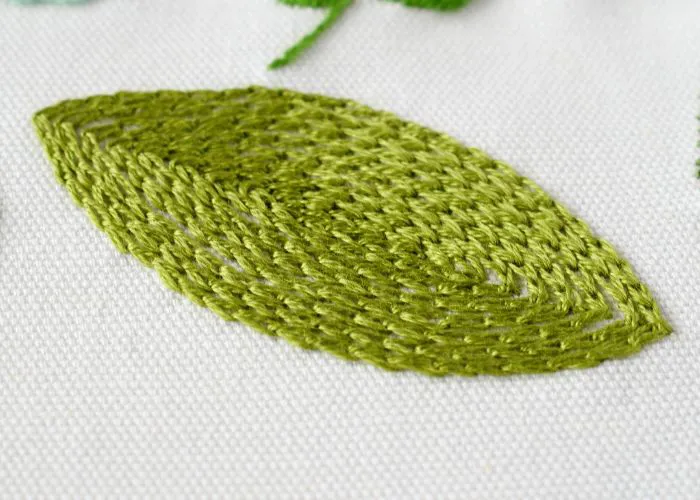
Cretan Stitch Leaf
In order to make a cretan stitch leaf, the stitches will also be close together, but they will fill in the shape of the leaf instead of a rectangular shape. They will also be worked at a slight diagonal. I find it helpful to draw the shape of a leaf and then draw two lines down the middle.
Cretan stitch leaf
As much as I'm an advocate of fine embroidery and using primarily 1 strand of floss in the needle, I believe working cretan stitch will be best if you have at least 2 strands of floss, especially when you work leaves. Otherwise, it will a) take a really long time to fill a shape b) will be not as dimensional.
Also, I would like to warn, that my way of working cretan stitch is slightly different from the ones you will find in many other resources. So be aware of that and maybe check out some other places to know which method suits you better.
I start my cretan stitch leaves with a lazy daisy stitch on top of the shape. After that I make a stitch to one of the edges, coming back to the front right under the lazy daisy stitch (and making sure that the needle is inside the stitch).
Repeating the same actions, but now on the other side of the leaf. And the needle appears right on the line of the “spine” again.
So, here's how your cretan stitch can look like. As you see, you can give it a gentle curve of the central vein instead of keeping it perfectly straight.
Naturally, you can make the filling more open if you wish.Leave a Reply Cancel reply
Sarah’s Hand Embroidery is your one stop destination for hand embroidery stitch lessons with step-by-step illustrations, patterns, projects, and a bit of history.
Sarah has been researching and sharing hand embroidery lessons for over 17 years, making it accessible to everyone around the globe.
10 Books | 500 Lessons | 200 Videos

Tegs:
Search
Recent Posts
-
Hawaiian Flower Embroidery Patterns: Discover Stunning Embroidery Designs Inspired by Tropical Blooms
Apr 14 2025
-
A Journey Back in Time: 19th Century Embroidery Techniques
Apr 14 2025
-
Brother PE Design Next V9: Take Your Embroidery to the Next Level
Apr 14 2025
-
Find the Perfect DMC Embroidery Floss at Hobby Lobby: A Comprehensive Guide
Apr 14 2025
Subscribe to Updates
Get the latest posts and fashion insights directly in your inbox.