Colonial Seamstress Tools: A Glimpse into Historical Sewing Practices
Step Back in Time: Explore the Tools of Colonial Seamstresses
Step Back in Time: Explore the Tools of Colonial Seamstresses
Were there any specific tools or equipment that tailors used to make dresses in colonial times?
Source: sites.udel.edu
In colonial times, tailors relied on a variety of tools and equipment to create finely crafted dresses. These tools were essential for cutting, stitching, and shaping the fabric into a desired design. While the tools may have varied slightly depending on the region and time period, there were several common ones that were used.
Another essential tool was the dressmaker's tracing wheel. This tool had a handle attached to a small wheel with evenly spaced teeth or notches. The tailor would place a piece of tracing paper over the fabric and use the tracing wheel to transfer the pattern onto the fabric. This was especially useful when making multiple dresses of the same design, as it allowed the tailor to quickly replicate the pattern onto different pieces of fabric.
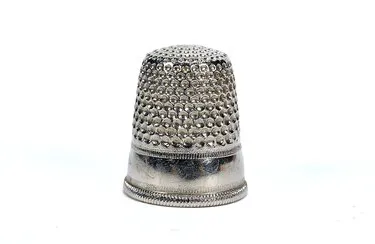
In addition to shears and tracing wheels, tailors used a variety of smaller tools to assist in the dressmaking process. These included needles, pins, and thimbles. Needles were used for hand stitching and came in various sizes depending on the type of fabric and stitch required. Pins were essential for holding the fabric in place before stitching, and thimbles protected the tailor's fingers from the sharp point of the needle.
Overall, tailors in colonial times had a range of tools and equipment at their disposal to create beautiful dresses. From shears and tracing wheels to needles and sewing machines, these tools were carefully chosen and maintained to ensure precise and high-quality craftsmanship. While modern technology has revolutionized the dressmaking industry, the tools of the past still hold a special place in the history of tailoring.
The Weight of a Dressed Bull: Unraveling the Mystery
You may want to see also
The Art Of Dressmaking In Colonial Times: Unveiling The Seamstress' Craft
In colonial times, clothing was not available in the abundance and variety that we are accustomed to today. Instead, people relied on skilled tailors to create their garments, including the beautiful dresses worn by women. These tailors possessed a unique set of skills and an eye for detail, allowing them to transform a bolt of fabric into a stunning gown that perfectly fit the wearer. Let's dive into the fascinating world of colonial tailoring and discover how these artisans crafted dresses that were both fashionable and functional.
| Characteristics | Values |
|---|---|
| Fabrics | Linen, wool, silk |
| Decorations | Lace, ribbons, embroidery |
| Silhouette | Fitted bodice, full skirt |
| Sleeves | Puffed, tapered, or long |
| Neckline | Square, round, or v-shaped |
| Closure | Buttons or lacing |
| Waistline | High or natural |
| Hemline | Floor-length or ankle-length |
| Layers | Inner petticoat and outer gown |
| Accents | Bows, ruffles, or pleats |
| Customization | Tailored to each individual |
| Hand sewing | Majority of the stitches were done by hand |
How we use glue basting for different techniques:
- Boro and Visible Mending:
Apply a thin layer of glue to the patch and adhere to base fabric, adjusting your placement as necessary. Then stitch down. We love the Roxanne Glue Stick because it glides on smoothly and the patches stay where we place them…until we decide we want them someplace else. Or… someplace else again. But then they stay put! - Quilt Binding and Bias Tape: After sewing on your binding to one side of the quilt, fold the fabric over the edge and apply a layer of glue. Press with a hot, dry iron to set, then hand stitch or machine sew the remaining seam down. No clips or pins needed; you don’t have to worry about that binding shifting. Our video features a no worries technique for making fabric tape with Roxanne Basting Glue.
- Curved seams: Apply a thin line of glue along the curved edge, carefully folding and shaping the fabric edge.
- Appliqué: Glue the edges of your appliqué piece to the base fabric, ensuring smooth edges and precise placement. Then use your favorite visible or invisible appliqué stitch for attaching. Be sure to watch the video for our tip for sharp corners on those appliqué pieces.
That’s all for now! Let us know if you want a recommendation for which glue is best for your project or share your favorites with us. And remember to check back for more about our fav products from Colonial Needle Company as well as projects and tutorials that show how we use this all-encompassing line of products in our studio.
Keep up with the Colonial Needle Company on their social media channels and YouTube.
Which CNC products do YOU have questions about? Let us know and we might just feature your question in a future video or post.
Until then…STITCH ON!!
Conclusion
The average colonial dressmaker earned about $100 a year. In large cities, they could make up to 400,000 a year.
A colonial dressmaker was a person who specialized in the creation of clothing in the style of the period. Dressmakers were an important part of the colonial world, as they were able to provide people with the clothing they needed to stay up-to-date with the latest fashion trends.


Tegs:
Search
Recent Posts
-
A Journey Through Time: Discovering the Art of Colonial Artisans
Jun 29 2025
-
Colonial Seamstress: The Art of Crafting Clothing in the 18th Century
Jul 23 2025
-
Seamstress Movie on Netflix: Find Your Next Sewing Inspiration
Apr 14 2025
-
Need a Seamstress in Windsor? Discover Top-Rated Tailoring Services in Ontario
Apr 14 2025
Subscribe to Updates
Get the latest posts and fashion insights directly in your inbox.